With my favorite email service Fastmail you can send emails from any email address, not just your [email protected] address. This tutorial will show you how to setup your iOS device (iPhone, iPad, iPod touch) to send as [email protected].
Add your email address to Fastmail
There are 2 ways you can add email addresses to Fastmail:
By adding a new Account
www.fastmail.com/help/receive/fetchotheremail.html
By adding a Custom Domain to your Fastmail account
www.fastmail.com/help/receive/domains.html
This it outside the scope of this article, but I’ll assume you already have this set up. If not, you wouldn’t be trying to send from a non-Fastmail email address right? If you need help, contact the Fastmail help desk and they’ll be able to help you.
In the examples below, I’ll be using support(at)clickwp.com as the custom email address. The address that came with my Fastmail account is actually clickwp(at)fastmail.com. Yours may be at fastmail.com, or fastmail.fm, sent.com or more. (I hope I’m not going to get a lot of spam now that I’ve put these addresses on the internet…)
Setup your iPhone / iOS device
The official instructions for setting up Fastmail on iPhone doesn’t work for custom addresses. If you’ve already setup your iOS device with these instructions, go into Settings → Mail, Contacts, Calendars and delete the Fastmail account you’ve previously setup.
Now tap Add Account and you’ll see this screen.

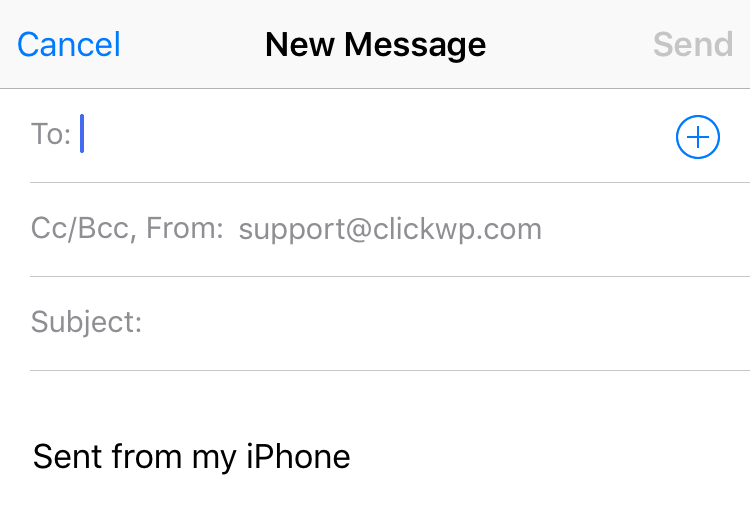
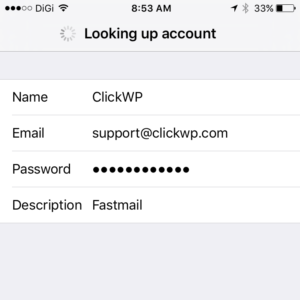
Tap Other, right at the bottom, and then Add Mail Account. Fill in your details on the next screen, but DO NOT use your [email protected] email address. Tap Next and your device will attempt to look up the details.
Your iPhone will now ask for your server settings. Make sure you’re on the IMAP tab and fill in the settings for the incoming and outgoing server. Both hostnames are mail.messagingengine.com and the username is your Fastmail email address. The password is the one you use to login to fastmail.com.

Tap Next and your iOS device will verify these settings. Once verified the account will be saved. Hooray!
There’s one final step. Go back to the accounts list (Settings → Mail, Contacts, Calendars) and tap on the newly added account. Next go to Account → Advanced. Scroll down to INCOMING SETTINGS and change the IMAP Path Prefix to INBOX.
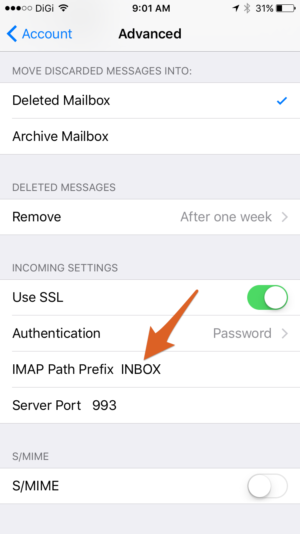
Now go back (Tap < Account on the top left) and save the changes by tapping Done.
Congratulations! You can now send and receive emails via Fastmail on iPhone with your custom email address.
Bonus Tips
Add more custom email addresses
After you’ve added these to your Fastmail account, go to your iPhone Settings → Mail, Contacts, Calendar. Tap on your Fastmail account.
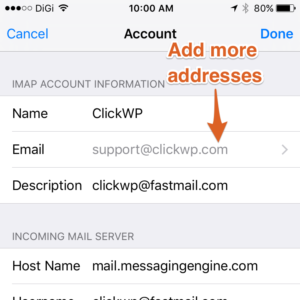
Now tap on the Email field, and you’ll be able to add more addresses. Easy! Remember to go back to the account screen and tap Done to save your changes.
Use the Fastmail app
The official Fastmail mobile app is pretty good, and automatically allows you to send from all the addresses you have setup in your Fastmail account. It’s available for iOS and Android. Download links here.

Looking for a better email experience? Signup for Fastmail.


Do you use folders in FastMail? Do you use your native iOS mail client? How do you setup it to get notified when a subfolder has any unread new message?
Yes I use folders in Fastmail, but I don’t think there’s a way to get notified when an email is delivered directly to a subfolder in iOS mail. I know that Spark Mail app has that feature
Thanks for your reply. I will look forward on Spark Mail, even if I appreciated the semplicity of the native iOS mail app.
Thanks,
Emanuele