WordCamp KL took place this past 25 November at Royale Chulan Bukit Bintang. It was a long 7 year wait for the official WordCamp to return to Malaysia, so I was eagerly anticipating the event.
Between the first WordCamp and this one, anyone could have organized another WordCamp. Unfortunately our local WordPress community appears to be very scattered and isn’t actively meeting up. I regret not taking a more active role too.
So you might expect that this WordCamp be a rather small and muted affair. In fact, this WordCamp was pretty big. 16 speakers, 14 talks and almost 200 delegates from 10 countries around the region. Hats off to the organizers, especially Sam Suresh for making it all happen in the first place.
A static website is an ideal format to archive a WordPress site because it is a plain HTML copy of the website. It doesn’t require PHP and MySQL, so the website is hack-proof and very fast. Here are step-by-step instructions on how to convert a WordPress website into a plain HTML, static website with the Simply Static plugin.
Step 1: Prepare your website
Since the static website will not have PHP, it won’t be able to process dynamic actions like form submissions. Disable or replace comments and contact forms with hosted alternatives (e.g. Disqus and Wufoo respectively).
Infinite scroll and dynamic “Load more” post functionality will be unavailable too, so convert your pagination to plain next/previous or numeric links.
Update the content to be an evergreen version of the website. Maybe you want to remove the dates from your posts. Remember, the website is going to stay like this forever (or for a very long time at least).
Deactivate all unnecessary plugins. You won’t need security and utility plugins any more.
Finally, backup your website. You never know when you may want to revive it.
I love Fastmail. They are a super email hosting provider that I’ve used for years now. They have been rock solid and constantly improving. This week I learned how to do something awesome with their email Rules.
Here’s what I wanted to do:
Automatically filter all newsletters and stuff I subscribed to into a Subscriptions folder.
Make exceptions for my favorite newsletters and keep them in the Inbox.
Here’s how to do it:
Subscriptions Rule : Filter all newsletters
My first attempt was to create a filter for each email provider – Mailchimp, Campaign Monitor, InfusionSoft, etc. But there are too many email marketing services and my rules list kept growing and growing.
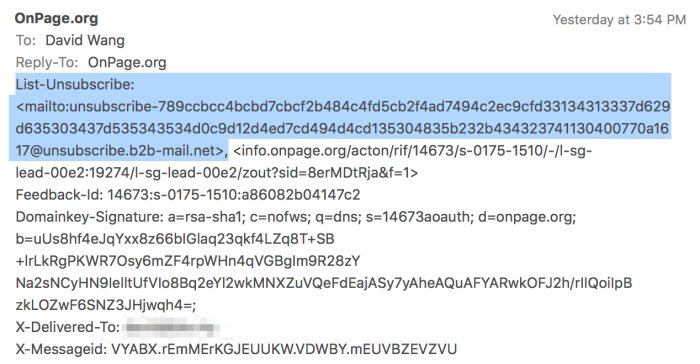
Then a lightbulb moment: All email marketing service providers include a List-Unsubscribe email header.
List-Unsubscribe email header
A quick support request to the awesome Fastmail team, and they told me how I could filter emails based on this header.
First, make sure you have already created a folder for Subscriptions (or Newsletters, if you prefer). Then go to Settings → Rules → Advanced. Then find the File into Folders tab. Create an advanced rule with the following settings:
Message with: Advanced
The text: exists ["List-Unsubscribe"]
File into folder: Subscriptions
Order: 1
Now any emails sent from a email marketing service will be sorted into the Subscriptions folder. Time to create some exceptions for my favorite newsletters.
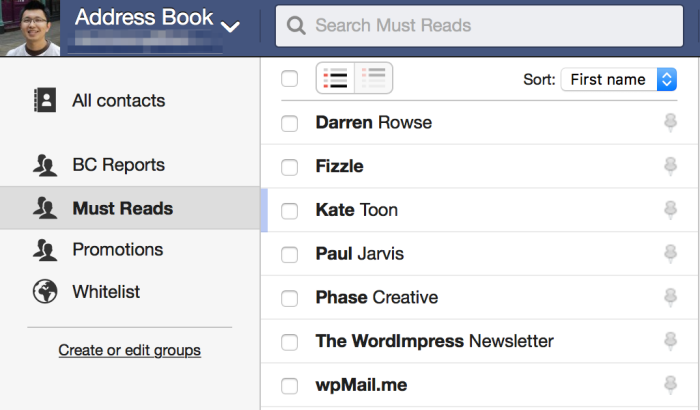
Exceptions Rule: Filter by Address Book group
Now go to your Address Book and create a new group. I call mine “Must Reads”. Add your favorite newsletter senders email address to this group.
Next, create another rule (Settings → Rules → Advanced).
Message with: Advanced
The text: header :contains "X-Spam-known-sender" "Must Reads"
File into folder: Inbox
Order: 0
Important! You must set the order of this exception rule to a lower value than the first rule. In my case, the order for my exception rule is 0 while the subscriptions rule is 1. This way, Fastmail will process the exception rule first and bypass the subscriptions rule.
Here’s what my rules look like:
Click for larger version
Yep, there’s another rule in there to filter emails that are just for Promotions e.g. senders who often email about sales that I want to take advantage of.
Hooray! Your inbox is now saner, and you won’t miss anything from the newsletters you really love.
Bonus tip: Unsubscribe from half of all your subscriptions. Seriously.
First, if at all possible, use the WP Migrate DB Pro or BackupBuddy plugins to migrate your WordPress database. The money spent will save yourself a lot of frustration and hair pulling, and hours if not days of cleanup and massaging of the WordPress database.
But if that’s not possible, welcome to my world for the past week. I’ve had to migrate a WordPress database without my favorite migration tools. After scouring the web for tutorials and tips, I’m compiling them here for easy reference.
Gather Your Tools
First thing you need is to get your hands on the following:
1. Database name, prefix, user and password.
You can find these defined in the wp-config.php file. In the following examples, be sure to swap out the database name wordpress and prefix wp_ with the correct values from your situation.
2. Access to phpMyAdmin so that you can interact with the database.
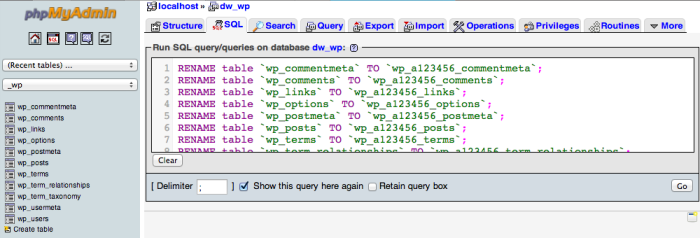
We’ll be running the commands below through the SQL tab in phpMyAdmin.
Running SQL queries on your database with phpMyAdmin
You could also connect directly to MySQL through the terminal / shell prompt. Good luck if you don’t have phpMyAdmin.
3. Backup, Backup, Backup
Don’t say I didn’t warn you. Export your untouched database and lock it up. If all goes wrong, restore to this backup.
Change the Site URL
The first thing you would want to do is to change the site URL. You can browse the wp_options table for the siteurl and home options values directly, or you can use this SQL command:
UPDATE wp_options SET option_value = replace(option_value, 'http://www.oldsiteurl.com', 'http://www.newsiteurl.com') WHERE option_name = 'siteurl' OR option_name = 'home';
Next, you’ll want to replace all instances of oldsiteurl.com in your post’s contents and GUID.
UPDATE wp_posts SET post_content = REPLACE (post_content, '//www.oldsiteurl.com', '//www.newsiteurl.com');
UPDATE wp_posts SET guid = REPLACE (guid, '//www.oldsiteurl.com', '//www.newsiteurl.com');
Had to figure this out earlier today and figured others might be looking for an answer too. I am assuming that:
You are using MAMP with the default ports (80 for Apache)
You are using Parallels with Windows 7 (although these steps should work for older versions too)
Step 1: Setup your local environment with MAMP
This step is pretty straightforward. If you put your website in /sitename should be able to load it at http://localhost/sitename/.
Here’s a helpful tutorial. Don’t forget to set your Apache and MySQL ports to the default 80 and 3306.
Step 2: Figure out your Mac’s IP address on the network
Go into your Mac’s Network Preferences. You’ll see 2 or more connections on the left and the active one will say Connected. Click on it and you’ll see the IP address on the right side of the pane.
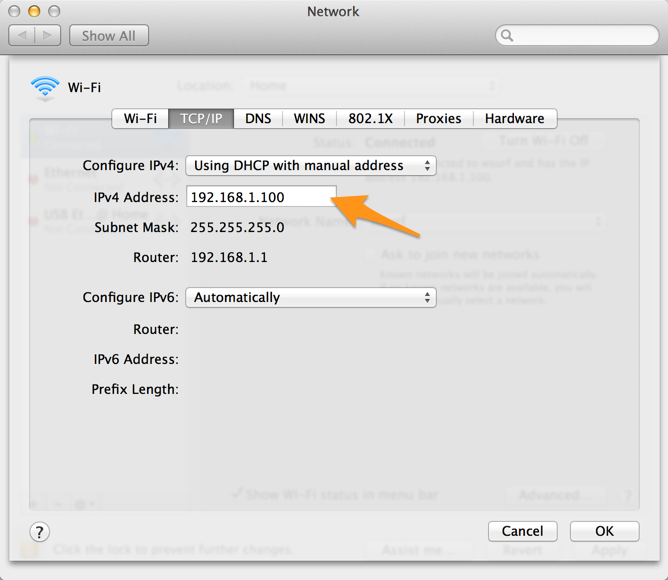
To make sure your Mac’s IP address doesn’t change, click on Advanced → TCP/IP. The options sheet below appears.
Change the IPV4 option to Using DHCP with manual address and type in an unused IP address. In the example above I used 192.168.1.100. Read More »
The above code will get overwritten when you update the theme, so it’s best to contain your modifications in a child theme. In your child theme’s functions.php file, add this:
add_action( 'after_setup_theme', 'add_remove_et_features', 15 );

function add_remove_et_features() {
    remove_action('init','et_activate_features');
    add_action('init','child_activate_features');
}

function child_activate_features(){
    /* activate shortcodes */
    // comment out or delete the line below to disable shortcodes
    // require_once(TEMPLATEPATH . '/epanel/shortcodes/shortcodes.php');

    /* activate page templates */
    require_once(get_template_directory() . '/epanel/page_templates/page_templates.php');

    /* import epanel settings */
    require_once(get_template_directory() . '/epanel/import_settings.php');
}
However I recommend that you don’t use ElegantThemes. Sure they’re cheap, but they don’t offer Automatic Updates which makes their themes pretty insecure and vulnerable to hackers. Elegant Themes finally includes automatic updates as of Dec 2013.
If you want high quality themes with rock solid security and top-notch support, go with StudioPress or WooThemes.
When I put together my original IKEA standing desk, I was still experimenting and wanted a solution where I could convert back into a regular sitting desk if necessary.
That solution worked well enough but it was never a long term solution. The biggest problem I had with it was that the computer screen was too far away from my face (the desk I used was 60cm deep) and I found myself leaning forwards to make out text on the screen. The desk was also pretty unstable and would begin to wobble if I was typing quickly.
So when I moved into my new home in late 2011, I began devising a more permanent and flexible solution. The result is this: a standing workstation made from an IKEA NUMERÄR countertop and an Ergotron LX Dual Stacking Arm.
My new standing desk is elbow height, with the awesome Ergotron LX Dual Stacking Arm
My Instagram yesterday got a lot of likes and apparently people are really interested to do this, so here’s a quick tutorial how.
This tutorial will show you how to post *selected* Instagram photos to your WordPress blog, automatically. All you need to do is to tag your Instagram with a hashtag for it to work.
ifttt
The key to doing this is a service called ifttt, which is short for “if this then that”. Basically you tell it to watch for a trigger (if this) and do something in response (then that). See the quick one-page guide on their site. Tip: ifttt is pronounced like ‘lift’ without the ‘l’. Read More »
I recently had to manually migrate a cPanel account (and all the websites and email accounts within it) to a new web host. I had BackupBuddy to migrate the sites super-easily, but the email accounts remained a problem. Not only were they full of emails but I didn’t have the email account passwords as well.
After Googling around I found the answer. Just copy the mail and etc directories to the new cPanel account. The mail directory contains all the email messages, while the etc directory contains all the settings. Simple!
And how do you copy the directories between servers? You could download it to your computer and up again to the new server, but this is where learning how to use the unix command scp comes in handy 🙂